传送门:
解析微软微服务架构eShopOnContainers(一)Identity Service - 解析微软微服务架构eShopOnContainers(二)上一篇我们说了Identity Service,因为其基于IdentityServer4开发的,所以知识点不是很多,今天我们来看下Catalog Service,今后的讲解都会把不同的、重点的拿出来讲,希望大家明白。
源码分析我们先看下它的目录结构,很标准的webapi目录:
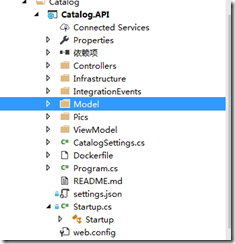
首先看下Program,跟IdentityService类似,多了一个UseWebRoot(“Pics”),把pics这个目录设置成了webroot,其他都一样。
在Startup的构造方法中,我们也看到了使用了secret manager tool,但是多了一个参数,在这里我们看到的是Assembly类型,其实secret只需要其中的userSecretsId而已。
在ConfigureServices中,我们看到如下代码:
services.AddMvc(options = >
{
options.Filters.Add(typeof(HttpGlobalExceptionFilter));
}).AddControllersAsServices();
添加了一个filter,这个HTtpGlobalExceptionFilter可以在项目中找到,大概的意思就是遇到抛出CatalogDomainException类型的错误时,返回特定的错误码。
AddControllersAsServices这个扩展方法是把项目中的Controller都注册到Services中,我们看下源码:
public static IMvcCoreBuilder AddControllersAsServices(this IMvcCoreBuilder builder)
{
var feature = new ControllerFeature();
builder.PartManager.PopulateFeature(feature);
foreach (var controller in feature.Controllers.Select(c = > c.AsType()))
{
builder.Services.TryAddTransient(controller, controller);
}
builder.Services.Replace(ServiceDescriptor.Transient<IControllerActivator, ServiceBasedControllerActivator >());
return builder;
}
中间那段foreach就是,这样我们在项目中通过依赖注入方式都能方便的访问到各个controller了。
Going down:
services.AddDbContext<CatalogContext >(options = >
{
options.UseSqlServer(Configuration["ConnectionString"],
sqlServerOptionsAction: sqlOptions = >
{
sqlOptions.MigrationsAssembly(typeof(Startup).GetTypeInfo().Assembly.GetName().Name);
//Configuring Connection Resiliency: https://docs.microsoft.com/en-us/ef/core/miscellaneous/connection-resiliency
sqlOptions.EnableRetryOnFailure(maxRetryCount: 5, maxRetryDelay: TimeSpan.FromSeconds(30), errorNumbersToAdd: null);
});
// Changing default behavior when client evaluation occurs to throw.
// Default in EF Core would be to log a warning when client evaluation is performed.
options.ConfigureWarnings(warnings = > warnings.Throw(RelationalEventId.QueryClientEvaluationWarning));
//Check Client vs. Server evaluation: https://docs.microsoft.com/en-us/ef/core/querying/client-eval
});
对DBContext的配置的时候,这里使用了Connection Resiliency(弹回连接)的方式,其中可以看到使用migration的时候,它使用了MigrationsAssembly(AssemblyName),这种方式跟我之前讲的FluentNhibernate有点类似,EnableRetryOnFailure设置了这个Action的失败尝试机制,如果Migration的时候遇到Failure,就会自动重试,这种方式避免了app与database分离造成的连接偶尔失败造成的影响。为什么会有这个机制呢?因为当我们的database在云端的时候,比如Azure SQL,不可避免的会出现网络连接问题,即使我们把app和database放在一个数据中心中,我相信偶尔也会有这个问题,我们现在可以通过配置,使其如果遇到失败就会重新操作,一定程度避免了网络偶尔造成的问题。你也可以设置一些策略,使其能够在运行命令的时候能够进行重试EF默认情况下只是记录client evaluation中的warns,我们可以通过ConfigureWarnings使其抛出这个警告,你也可以配置成忽略。
接下来我们看到如下代码:
services.Configure<CatalogSettings >(Configuration);
我们可以在eShop的各个项目中都能找到类似的语句,它会把一些项目相关的Settings注册到services中,使其成为环境变量,我们可通过setting.json进行配置。除了通过setting.json进行配置,我们还能通过Docker run –e 进行灵活化配置。
在这里我们的CatalogSetting含有一个ExternalCatalogBaseUrl属性,我们在docker run的时候可以输入如下命令:
docke run -e "ExternalCatalogBaseUrl=http://localhost:5011/" ....
这样就能灵活的通过docker命令进行配置了,非常方便,我们也可以通过-e对我们setting.json中的变量进行赋值,比如ConnectionString,你可以通过点击了解更多相关内容。
// Add framework services.
services.AddSwaggerGen();
services.ConfigureSwaggerGen(options = >
{
options.DescribeAllEnumsAsStrings();
options.SingleApiVersion(new Swashbuckle.Swagger.Model.Info()
{
Title = "eShopOnContainers - Catalog HTTP API",
Version = "v1",
Description = "The Catalog Microservice HTTP API. This is a Data-Driven/CRUD microservice sample",
TermsOfService = "Terms Of Service"
});
});
services.AddCors(options = >
{
options.AddPolicy("CorsPolicy",
builder = > builder.AllowAnyOrigin()
.AllowAnyMethod()
.AllowAnyHeader()
.AllowCredentials());
});
上面两段代码,分别配置了SwaggerGen和Cors(跨域)策略,SwaggenGen是一个非常实用的框架,它能自动把我们的api转为web方式呈现在我们眼前,还能进行调试,非常好用。Cors的配置这里用的不好,它允许了所有请求,建议还是按照实际需求来吧,否则没有跨域设置的意义了。
接下来我们看到了一系列的add service的操作,都是关于EventBus的,稍微看了下,发现目前只做了log的动作,我们看下代码:
if (raiseProductPriceChangedEvent) // Save and publish integration event if price has changed
{
//Create Integration Event to be published through the Event Bus
var priceChangedEvent = new ProductPriceChangedIntegrationEvent(catalogItem.Id, productToUpdate.Price, oldPrice);
// Achieving atomicity between original Catalog database operation and the IntegrationEventLog thanks to a local transaction
await _catalogIntegrationEventService.SaveEventAndCatalogContextChangesAsync(priceChangedEvent);
// Publish through the Event Bus and mark the saved event as published
await _catalogIntegrationEventService.PublishThroughEventBusAsync(priceChangedEvent);
}
上面的代码意思是在价格有变动的时候,我们就调用EventService进行保存,同时对操作进行了记录。PublishThroughEventBusAsync方法则对这条记录的State更改为published。目前来说我不太清楚为何要用这种方式,也不知道为何取名为EventBus,不过我在项目的issue中已经提出了这个问题,希望项目的开发者们能给我一个答案。我有查看了Basket.Api,在这个项目中会有订阅行为,具体的等到下一章我们再仔细看看。
ok,我们再看下Configure方法,下面一段代码我们可以学习下:
var context = (CatalogContext)app
.
ApplicationServices.GetService(typeof(CatalogContext));
WaitForSqlAvailability(context, loggerFactory);
我们看到在这里它调用了之前注册的CatalogContext,它并没有通过new进行实例化,而是通过GetService的方式获取之前的注册,这样context所依赖的其他实例也一并带进来了,非常方便好用。
WaitForSqlAvailability方法是对数据库可用进行尝试,因为后面它需要进行数据迁移。
CatalogService包含了2个Controller,一个是PicController,一个是CatalogController,PicController仅仅是根据ID获取了图片,CatalogController展示了用webapi如何做CURD。
运行部署如果你要运行Catalog.Api,你必须安装MSSQL和RabbitMQ,这次我把我的系统换成了Win10 Pro,并在电脑上使用Docker安装了MSSQL-Server-Linux和RabbitMQ。安装这2个非常简单,仅仅需要输入几条命令即可:
docker run --name mssql -e 'ACCEPT_EULA=Y' -e 'SA_PASSWORD=Pass@word' -p 5433:1433 -d microsoft/mssql-server-linux
docker run -d --hostname my-rabbit --name rabbitmq -p 8080:15672 -p 5672:5672 rabbitmq:3-management
ok,我们使用docker创建了mssql和rabbitmq,这里注意一下,我把mssql的端口映射到了本机的5433上,还有rabbitmq的管理页面,我映射到了本机的8080端口,你可以通过http://localhost:8080 进行访问。
上一篇我们说过我们可以通过iisexpress/Kestrel或者docker的形式运行因为牵涉到配置,所以这两种方式的运行有些不同。
一、iisExpress或Kestrel方式下,因为刚刚我们把mssql和rabbitmq的端口都映射到了本机,所以我们只需要在setting.json中把数据库连接和rabbitmq的地址指向本机即可,如下:
{
"ConnectionString": "Server=tcp:127.0.0.1,5433;Initial Catalog=Microsoft.eShopOnContainers.Services.CatalogDb;User Id=sa;Password=Pass@word",
"ExternalCatalogBaseUrl": "http://localhost:5101",
"EventBusConnection": "localhost",
"Logging": {
"IncludeScopes": false,
"LogLevel": {
"Default": "Debug",
"System": "Information",
"Microsoft": "Information"
}
}
}
ok,Ctrl+F5,运行一下看看:
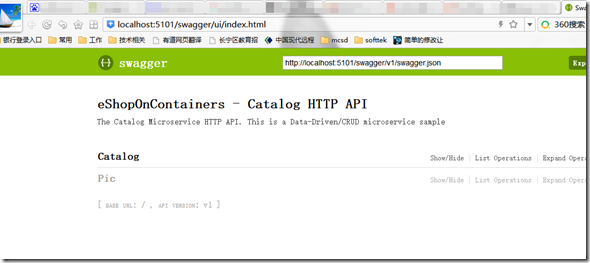
当看到上面这个页面,说明你的运行正常了,你还得测试下api是否运行正常,比如Pic,比如Items。
二、docker中运行,参照上一篇的方式,先publish再build image, 不过这里要注意一点,因为你之前的ConnectionString和EventBusConnection都是指向本机(127.0.0.1)的,所以这里必须改一下,改成主机的ip地址或者是对应容器的ip也可以,如果您不想更改的话,也可以通过docker -e进行设置,比如:
docker run -p 8899:80 --name catalog -e "EventBusConnection=172.17.0.2" -d catalog:01
我这里的172.17.0.2是我rabbitmq容器的ip地址,你可以通过docker inspect containerId 进行查看容器的ip。
如果一切配置都正确的话,你就可以通过浏览器http://localhost:8899 进行浏览了。
当然,除了正常浏览外,你还需测试下api是否正常。

来源:http://www.cnblogs.com/inday/p/catalog-service-eshopOnContainers.html
说明:所有来源为 .net学习网的文章均为原创,如有转载,请在转载处标注本页地址,谢谢!